How to Remove Background in Photoshop – 5 methods to try
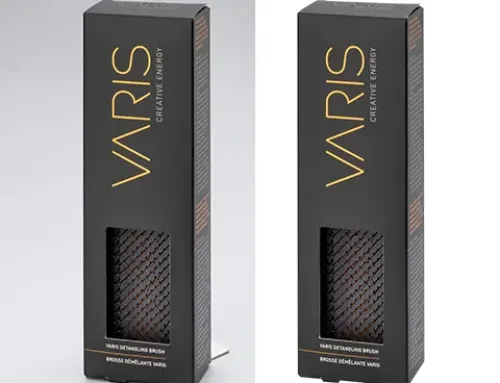
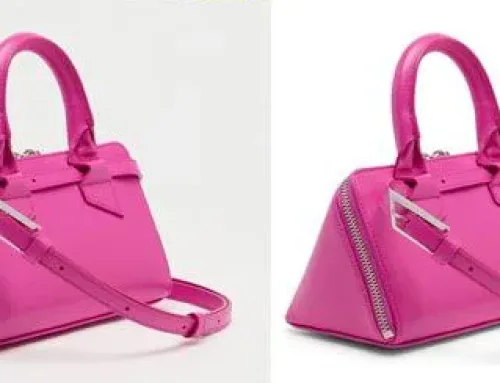
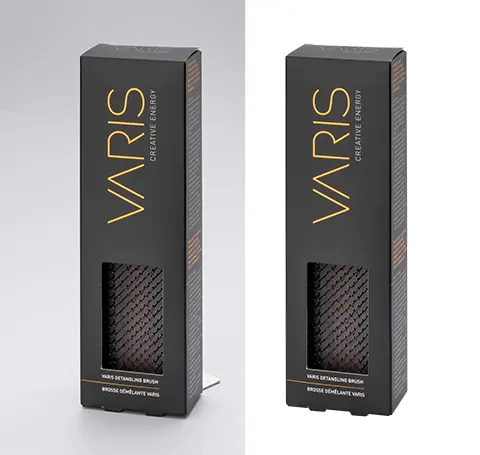
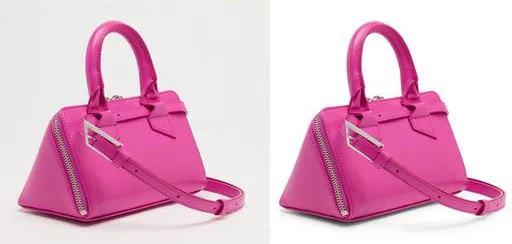
Image editing often involves removing the background of an image. You can remove background of photos with AI tools, or to be meticulous, you can use the OG Photoshop. Adobe Photoshop offers comprehensive options for eliminating backgrounds with great accuracy. More than that, each method is tailored to meet the needs of specific images.

However, when deciding on a suitable method, you may end up breaking a sweat!
So, here’s the end of your never-ending search. If you are wondering which method to use and on which background, this thorough step-by-step guide is all you need. Explore Photoshop’s five most popular and effective background removal tools with us. You don’t need to be a tech geek to do these tasks. You just need a bit of patience and an eye for detail. Get on board!
How to Remove Background in Photoshop
Photoshop’s background removal tools vary depending on your image subject and how precise you want it. We’ve rounded up easy to advanced methods for your convenience. Let’s find out what suits your work style.
The Background Removal tool
Here goes the first conventional method to remove background in Photoshop, the Background removal tool. Using this method is the easiest way to get your Photoshop cutout. However, it only works best with photos with one simple subject on an uncluttered background.
Also, this tool is not very effective at polishing the edges, so if you don’t care about smooth edges but need to erase backgrounds quickly, this is your shot.
- Start Photoshop and open your image from the Files
- Access the Layers tab on the right-hand side of the window.
- Press CTRL+J (for Windows) or Command+J (for MacOS) to duplicate a layer.
- You will find the Properties panel under Window > Properties on the menu bar.
- Under the Quick Actions feature, click Remove Background.
As a result, Photoshop will automatically identify your subject and remove your background using the layer mask. This means you’re hiding some parts of your picture without getting too technical.
This was way too simple, right? Well, if you want more detailed results, you need to see the following alternatives we have picked for you.
The Pen tool
Most of the time, we use the Pen tool to generate a clipping path in Photoshop. This tool is versatile, but its efficient application involves patience and experience. The Pen tool does the best background removal when you have images with complicated details. Let’s break it down:
- To start, choose ‘Pen tool’ from the Toolbar. Alternatively, you can type ‘P‘ to access it.
- Select Path from the options menu. It will be in ‘Path‘ mode then.
- As you open your image in Photoshop, you can zoom in on the edges of your image subject from different angles. This process will create anchor points and an overall outline covering your subject.
- Next, you can get a straight line if you connect an anchor point between two points. For curved shapes, hold your mouse at one anchor point.
- Now, if the Path needs more refinement, drag the control arms. Press Alt (Windows)/ Option (MacOS) to change individual arms. Aim for an edge-to-edge alignment.
- To fix an error, hit Ctrl (Windows) or Cmd (MacOS) to move the anchor point.
- When you’re done mapping, choose Make Selection from the right-click menu. Click OK. It will convert your Path into a selection.
- Last but not least, unlock your image layer. You will see the Layer Mask icon at the bottom of the panel. Click it, and you’re done with the background removal! Adjust the output with the Brush tool.
To download your image, go to File > Save a copy. Save it as a JPG or PNG file.

Background Eraser Tool
The background eraser tool lets the user have specific control over the task. Plus, this method is beginner-friendly. As the name suggests, this tool is built specially for image background removal.
If you want to work with this method, here are the instructions:
- First, on the Toolbar, find the Eraser Tool.
- The drop-down menu will have an option named Background Eraser Tool. Select it.
- You will see the relevant options window above the image window.
- Now, you can customize the tool brush size, limits, and tolerances based on your requirements.
- After making the necessary adjustments, go ahead and erase the background.
- To undo an action here, press Command Z on MacOS or Ctrl+Z on Windows.
By the time you’re done, you’ll have a backdrop with checkers in the background. And voila! It’s done.

Layer Mask Method
The layer mask method is a popular Photoshop technique through which you can erase an image’s background with colors overlapping each other. And guess what? This method comes with increased control over your work, so there’s no extra stuff to mess with.
- When adding a layer mask, click on the Photoshop top menu bar. You will find Layer in the options.
- From the drop-down menu, find and select Layer Mask > Reveal All.
- You will see a relevant layer mask thumbnail on the layers tab.
- Here’s what this layer mask thumbnail means:
- White refers to visible areas
- Black marks invisible regions.
- Areas with complete transparency and opacity are grey.
- Next, click the thumbnail to turn it into an active layer in the layers panel.
- You can now see the squared black and white icons at the bottom of the toolbox. The icons represent the default foreground and background colors. That means if the foreground color is set to black, the parts of the layer mask won’t be visible. On the contrary, if you switch to white, the layer mask sections will appear.
- At this point, you can use the Brush Tool to remove or restore bits from the Layer Mask. Also, you can zoom in if you need to focus on specific details.
- After removing the background, you can delete the layer mask or keep it for later use.
As you have your image cutout, you can easily drag your isolated subject to your chosen background.
The Quick Selection Tool
If you want to add a touch of artificial intelligence to your Photoshop image editing, we have the Quick Selection tool tutorial for you. This tool leverages Adobe’s Sensei AI technology. It allows you to track edges within images after creating a selection. That way, separating your subject from the background will be a breeze!
Why do we love this tool? This is because it lets you remove backgrounds from images with intricate details. Also, when the subject and background of the image are highly contrasted, the Quick Selection tool is the best choice!
Here are the details!
- First, open your image file in Photoshop. Next, find the Quick Selection Tool on the left side menu bar. You will find it between the options ”Object Selection Tool” and ”Magic Wand Tool”.
- You can now resize the brush according to your needs. Here’s a pro tip: Use the Enhance Edge feature in the Options panel to ensure smoother and better-quality edge selection.
- Click and drag your brush over your subject. When you move the pointer over your selected area, the Quick Selection Tool automatically searches for matching tones around it until an edge is found.
- Now, there might be some areas you will want to include in your selection. AI doesn’t always get it right. In that case, you can simply click on an area and drag it over to add it to the selection.
- And if you want to remove something from the selection, press the Alt key (Windows) or Option key (MacOS) on the keyboard. Then click on the part you want to deselect.
- To dig deeper into the additional editing, open the right-side tab ‘Properties.’ You will find options to modify the Contrast, Smooth, and Shift Edge sliders on the Global Refinement tab. It will get rid of blurry edges.
Lastly, hit Output in the Properties tab. Next, give your selection a Layer Mask and click OK. If you want a PNG file, choose File > Save a copy. You can also use this step to save your PNG file while applying all the above background removal techniques.
How to remove background for bulk images?
As you already know the steps to remove background of any images, this question can arise: How do you remove the background for bulk images?
Even though there are multiple effective techniques available in Photoshop for background removal, this task can be tedious for bulk work. And when you are in an e-commerce business, you will often need an expert photo editing service. But where do you find them, you ask?
Here we are! We have been successfully editing and retouching images for years at Fotomasking. No matter what you need for branding or business, our image editing team has the experience you need. Most importantly, we stand out in background removal projects, too!
Before we go…
While background removal in Photoshop sounds easy, it requires careful attention from the editors. We recommend going over these tutorials while working directly in Photoshop. That way, you will learn more by experimenting. Consequently, you can find the most suitable solution to fit your specific needs to remove background and edit the image as per your choice. Happy editing!
Techradar, Govisually, Slack

