DIY – The Ultimate Guide to Ace your Photoshoot
In this digital marketing era, business owners always want to stand out from the crowd. Therefore, you must utilize contemporary tools and strategies if you have an eCommerce business.
However, it does not apply only to eCommerce site owners. You can simultaneously continue advertising your products in print and social media through product photography. So, that would include your Instagram page, outdoor billboards, product brochures, and so on. Due to this, we’ve put together the ultimate product photography guide for you, complete with tips and tricks.

Your brand identity relies heavily on your product photography. Thus, it is inevitable for your social media campaign, your eCommerce store, and other parts of your marketing strategy.
Importance of Photography in Online Business
- Visual Impressions.
- Grows Brand Identity.
- Targeting Audiences.
- More Engagement on Social Media with Quality Info-Images.
- Boost Sales and High Conversion Rate.
What is Product Photography, and why is it Important?
Before we start giving you tips on effective e-commerce photography, let us clarify the concept here.
Here let us talk about how significant product photography is for your business.
- Your brand identity relies heavily on your product photography. Thus, it is inevitable for your social media campaign, your eCommerce store, and other parts of your marketing strategy.
- Secondly, when your target audience visits your site for the first time, the quality of your product images will speak for your business.
- Additionally, visual impressions serve as an instant trigger in consumers’ minds to encourage them to make a purchase.
- Lastly, getting your pictures right can boost your sales conversion rate.
Beginners Tips for Product Photography
This section will discuss the essential product photoshoot tips for beginners. In the end, you will learn how to rejuvenate bulk photos in one go using a professional image editing service. So, keep on reading!
Use a tripod for consistent photos
You may think that a tripod is a luxury when you are just starting out with your e-commerce photography. You can try handling the camera with your hand for a few pictures. However, more professional photographs of your products will be necessary as your business grows. Hence, it’s an investment that can help standardize the product’s direction in every photo.
In most cases, a tripod is not necessary when taking lifestyle photos. Even so, product-only shoots will require a tripod.
Here are some primary benefits of using a tripod:
- You won’t have to waste much of your precious time on the background and lighting.
- Additionally, the repeated blurry shot segment will no longer occur.
- Tripod will make sure that the focus is on-point.
- Lastly, your photo style will have a nice touch of consistency.
We recommend buying a tripod within your budget. You can choose between a traditional or a flexible tripod. The bonus of using a flexible tripod is adjusting its height and keeping it on suitable surfaces to get the perfect angle.
However, in case of a tight budget, you can use some other props (a table, chair, or some objects) to steady your camera.
The correct background matters a lot
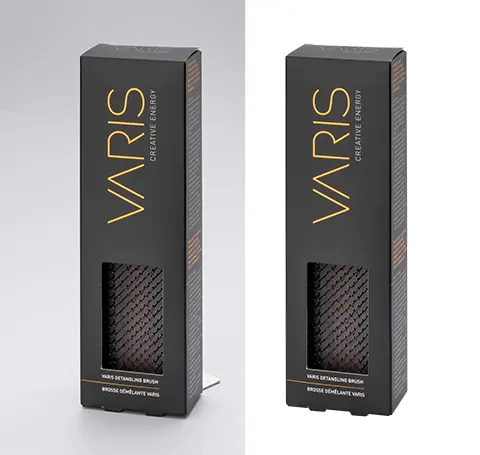
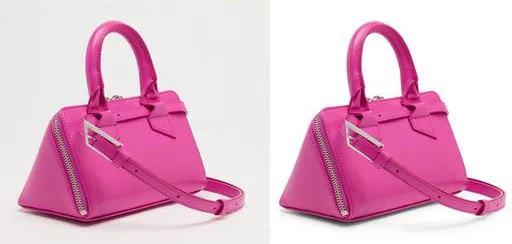
Having the right background for a photoshoot can make image post-production much simpler. Also, it can prevent unwanted highlights. Hence, there will be less reflection in the scene, and you won’t have to spend more time editing. From that perspective, a white or light gray background will make your photography stand out more.
Now here is our quick tip for beginners. You can improvise a background without buying a photo sweep or lightbox. In that case, a white paper roll along with a table (or chair) can work as an alternative. As an added bonus, paper rolls enable you to cut off the damaged, dirty part between the photo session.
However, note that the effectiveness of this process depends on the product type.

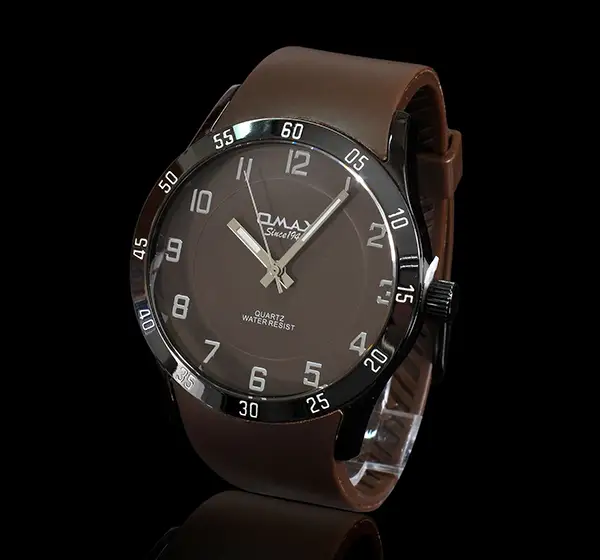
Make sure the lighting is perfect
Lighting setup is one of the most critical aspects of photography. You can shoot and edit photos more effectively with the proper lighting arrangements.
You can choose natural or studio lighting. In either case, ensure adequate lighting for your product. Moreover, maintaining a consistent color shade of your product is necessary to prevent future disagreements between the buyer and you, and that is only possible with properly lit products while avoiding unwanted shadows.
If you want to remove or make custom shadows for your product images, then you can hire FotoMasking.
The most effective ways to use natural lighting
In terms of cost-effectiveness, natural light is the preferred choice. Nevertheless, as you cannot control the depth of sunlight, it can be challenging. Remember, product photography requires an even light source.
Keep in mind the following points:
- Try to shoot during the peak of the sun’s rays, when it’s bright outside.
- Too much direct sunlight will produce unpleasant shadows during the shoot. Be careful of it, as it can make the editing process difficult.
- Ideally, the best time to hold an outdoor lifestyle photo session is late afternoon or early morning.
- As an alternative to supplemental lighting at the post-processing stage, drape curtains over windows to dim the natural light.
- If you’re taking product-only pics, place the table next to a window for optimal lighting.
- Additionally, you can experiment with moving the table (bringing it closer or moving it farther away) to create diverse effects. The closer the table is to the window, the more lighting effects will be soft and smooth. Anyway, moving the table further out will provide an even lighting atmosphere. However, it will also result in sharper shadows, and you’ll want to be careful here.
- We recommend opting for a reflector or a fill light. Thus, the light will be evenly distributed over the product model without producing harsh shadows. You can buy a reflector, or as an alternative, you can use a white card piece as the fill light. Covering the card with aluminum foil will enhance its reflective properties.
Utilizing the studio lighting
Despite being more expensive than natural light, studio lighting can offer you a more controlled and balanced lighting environment.
Initially, it may take some time to arrange, but it is well worth the effort. Moreover, the products in the photos will have a consistent look, which will benefit the brand’s image. Also, studio lighting will simplify the process
if you are shooting bulk photos.
You will need a minimum of two high-quality lights for this indoor arrangement. Here, we recommend using identical cool-colored light bulbs.
However, a note of caution: knowing the lights’ positioning properly requires expert hands to some extent.
You can learn more about setting up studio lighting and avoiding common photographic mistakes in our blog.
Decide which camera is right for you
Successful product photography requires a suitable camera. In case of budget problems, don’t fret that you have to spend a lot of money on an expensive DSLR. Therefore, an iPhone can serve as a backup for the time being.
Well, if you’re interested in investing in a DSLR, consider these recommended settings:
- Modify the WB (white balance) settings to the same Kelvin temperature you have set for your studio lights.
- You should adjust the aperture based on the type of photo. A wide aperture or f-stop setting helps you blur your product in some areas. Alternatively, go with a smaller aperture setting for a more significant depth of field.
- You don’t need to use any flash as you’ve already chosen the proper lighting (natural or studio lighting).
- Select the highest quality setting on your DSLR camera. There are typically two settings available:
- Quality – Go with the Superfine option. This feature provides the maximum image quality while using your camera’s entire pixel count.
- Size: Select the Large option. Therefore, it will enable the largest image size.
Whenever you’ve got everything set up the way you want it, make sure you document it for future use.
Taking multiple pictures is a smart strategy
Once your background, studio lighting, camera, and product are ready, you are prepared to put it all together!
At first, the snaps may get a bit blurred, shaky, or not so up to the mark. Hence, taking multiple shots from different views, angles, and distances is always advisable. After that, you can evaluate them better on a computer. Also, using a program (e.g., Adobe Lightroom) for organizing and editing photos will speed up the process.
Get your images optimized
Your website will load slower if it includes large-size images. And that can negatively impact your SEO. To avoid that, image optimization will help load the page faster.
The good news is that many free and premium photo-minimizing tools (such as Tinypng) compress the images while preserving photo quality. Here, it will help if you aim to keep the maximum image size of 200 kb.
In the end, name the image files correctly. Additionally, geotags, metadata, and relevant keywords boost search engine rankings.
Edit photos using a photo editor
Lastly, even if the photos turn out to be excellent, post-production is essential.
Just a bit of simple retouching transforms an ordinary picture into something professional and stunning. By using photo editing software, you can remove backgrounds, correct colors, or add shadows. However, it’s not like using Photoshop is a must, and it is a bit too complicated for beginners.
Hence, you can start with user-friendly tools like Snapseed, Canva, GIMP, Fotor, Befunky, etc.
Alternatively, how about letting a professional handle this step for you? Many photo editing agencies like us offer retouching services at affordable prices.
Before we go…
You now know how product photography can significantly impact the digital marketing sphere. Also, it’s a no-brainer that this particular way of advertising can help you achieve your sales target within a short period. Henceforth, with this comprehensive blog, we hope you will be much more confident at the beginning of your product photography journey.
Courtesy
Pixabay, Google